inspire:

lawn

landscape

educate:

Blog Home

Blog

garden

home

fashion

empower:

projects

community

We are dedicated to Inspiring, Educating and Empowering women to roll up their sleeves and get their hands dirty!
FAWN + HEATHER

Composting 101

Educate
Those Plant Ladies

Recently, we shared some Instagram stories to show off a compost bin called the Geobin from Amazon that we have been trying out. Visit our Instagram page and check out the highlights to see our early review of that bin! Our community was so interested and wanted to know all the things there are to know about composting, especially how to get started!

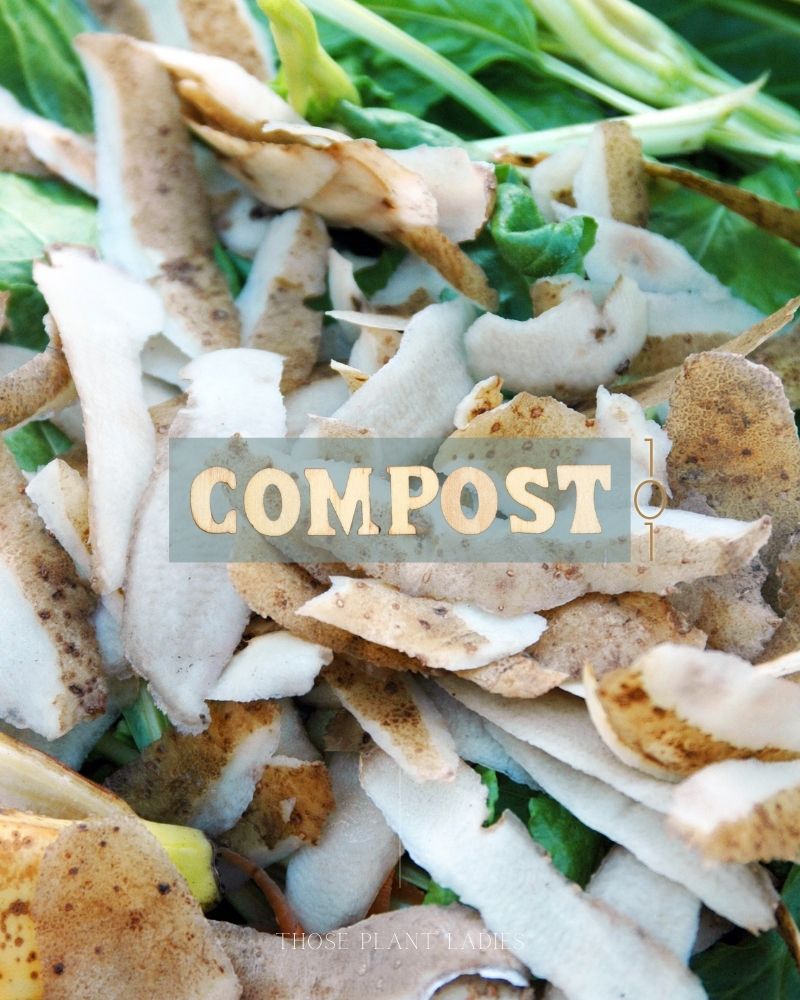
Fruit and veggie scraps ready to be composted.

Our best advice for someone who is trying to get into composting is to just get started! Composting is truly an ongoing and forever evolving experiment for every person who does it. You will constantly be trying new things, seeing what does and doesn’t work, and honing your composting skills to make your compost faster and more efficiently over time. We don’t want to leave you at that with no direction though, so we’ve got an overview of the essentials of every composting operation… no matter how large or small!

Food scraps for composting; blog post from Those Plant Ladies.

1. Place

You have to put your compost somewhere. We know, this is a no-brainer. There are a lot of places you could put your compost and a lot of containers to put it in. In general, your composting set-up should be in a protected area of your yard where the ground is flat and there is at least a three foot by three foot area. Keep it away from intense sunlight, high winds, or heavy rains. If you have a tree or natural area where you can tuck it where it receives a little shelter, that’s perfect. 

Composting set-ups come in so many shapes and sizes so we’ll have to dive into that a bit deeper… another time! Most outdoor set-ups will be an open container of some sort. You can build them yourself from wooden pallets or wire mesh. These DIY bins are usually open and exposed but lids can be made if you decide to get fancy. You can also purchase bins that are stiff, enclosed containers, or those that are flexible, plastic mesh (such as the Geobin).  Each set-up has its strengths and weaknesses. If you or your neighbors are concerned about pest issues developing, choose an enclosed set-up. If you want to compost large amounts of material and have an easier time turning it, choose the pallet option. They all serve the purpose of providing a place for your compost. Choose one that will get you started and you can always add on or change your mind later!

Wooden background with wood letters spelling out COMPOSTABLE.

2. Fuel

You have to have something to compost if you want to compost! The things that we can compost are traditionally divided into two categories – greens and browns. Browns are those items that have a higher ratio of carbon in their make-up and greens are those that have more abundant nitrogen in their make-up. You’ll see many recommended ratios that tell you how much you need of each in your compost pile. There is a lot of really complicated math that you can do to get your pile to just the right ratio. For a beginner, we are going to stick with the one to one rule. You should incorporate equal parts brown items and green items into your compost. For every one pound of greens, you should add one pound of browns.

Here is a chart with commonly composted items, whether they are considered a green or brown, and some items to avoid composting.  

What to put in your compost, poster by Robin Clungston.
POSTER IMAGE CREDITS: Robin Clungston
PURCHASE POSTER HERE

THINGS TO COMPOST:
GREENS
THINGS TO COMPOST:
BROWNS
1. Fruit and vegetable scraps
2. Grass clippings
3. Eggshells
4. Hair and/or pet hair
5. Coffee grounds and filters
6. Tea and tea bags
7. Yard waste (weed and disease free)
1. Uncoated cardboard (including paper rolls)
2. Newspaper (not glossy)
3. Sawdust or small wood chips
4. Napkins, paper towels, or paper bags
5. Dried leaves
6. Wood ash (natural wood only)

DO NOT COMPOST:
1. Pet Waste
2. Meat
3. Dairy
4. Whole eggs
5. Bones
6. Colored or waxed paper
7. Charcoal ash
8. Grease, oil, or fats
9. Diseased or weedy plants
10. Large pieces of wood
11. Plastics


Food and natural earth, ready to be composted.

3. Decomposers

Compost doesn’t just happen on it’s own! It sort of does but it doesn’t happen without the decomposers present that do the work of turning all that waste into “black gold”! Your compost pile will need all kinds of critters – some we can see and some we can’t – to break down waste efficiently. Your compost pile will be home to fungi, bacteria, animals like earthworms and insects, and more that will get to work making compost in your pile. The good news is that you really don’t have to do anything to get these good guys to show up. Nature will do that for you! However, you do have to make sure that they are able to thrive in your composting system. To do that you need…..

Up-close look at worms and other critters necessary to break down the compost.

4. Air

Those organisms living in your compost pile need air! Without good air circulation in your compost pile, it may begin to have an odor as anaerobic (without oxygen) decomposition starts happening. Fermentation is another common anaerobic process that definitely has an odor as well! Aerobic (with oxygen) decomposition is much faster and much healthier for your compost pile. You can make sure that your compost pile has good airflow simply by turning it once per week. Just take a pitchfork and give it some good stirs, like mixing up your favorite tossed salad. There are more sophisticated aeration systems you can try such as inserting a PVC pipe with holes drilled in the sides deep into the middle of your pile like a compost chimney. Again, we encourage you to start simple with a regular turning schedule. As you experiment and learn what works best for you, feel free to look into these more advanced strategies. 

A wooden compost bin.

5. Water

Those decomposers need water too! Fungi love moist, humid environments. Earthworms don’t survive in bone dry soils. Most metabolic processes happen faster when moisture is present. All of these things are true in your compost system too! The contents of your compost pile should be as moist as a wrung-out sponge. If you squeeze your compost and water comes out, it is too wet. If it feels totally dry to the touch, it is too dry. Except during periods of extreme weather, you should be able to bring a hose with you when you turn your pile weekly and add water to keep the pile at the right moisture level. Every few turns with the fork, turn the hose on and add some water. If you are experiencing extreme drought, add extra water. If you have seen heavy rainfalls, maybe skip that week. 

A metal compost bin with a shovel and composted dirt ready to use.

That’s it! Those five things will get you started with your dream composting system! Don’t forget that anything compostable will also break down on its own in nature without any help from you so the act of composting is really just about speeding along those natural processes and capturing the end product to use to amend the soils of our gardens and landscapes. You can’t do much to actually mess it up since nature will take care of the work eventually! So don’t be afraid to dive in, get started, learn a lot, and do so much good for the world through composting!


Ready to get started? You don’t need much but we have compiled a shopping list of some of our favorite composting systems and accessories to get you started!


PIN FOR LATER

Composting 101

Educate, Landscape

Recently, we shared some Instagram stories to show off a compost bin called the Geobin from Amazon that we have been trying out. Visit our Instagram page and check out the highlights to see our early review of that bin! Our community was so interested and wanted to know all the things there are to know about composting, especially how to get started!

Fruit and veggie scraps ready to be composted.

Our best advice for someone who is trying to get into composting is to just get started! Composting is truly an ongoing and forever evolving experiment for every person who does it. You will constantly be trying new things, seeing what does and doesn’t work, and honing your composting skills to make your compost faster and more efficiently over time. We don’t want to leave you at that with no direction though, so we’ve got an overview of the essentials of every composting operation… no matter how large or small!

Food scraps for composting; blog post from Those Plant Ladies.

1. Place

You have to put your compost somewhere. We know, this is a no-brainer. There are a lot of places you could put your compost and a lot of containers to put it in. In general, your composting set-up should be in a protected area of your yard where the ground is flat and there is at least a three foot by three foot area. Keep it away from intense sunlight, high winds, or heavy rains. If you have a tree or natural area where you can tuck it where it receives a little shelter, that’s perfect. 

Composting set-ups come in so many shapes and sizes so we’ll have to dive into that a bit deeper… another time! Most outdoor set-ups will be an open container of some sort. You can build them yourself from wooden pallets or wire mesh. These DIY bins are usually open and exposed but lids can be made if you decide to get fancy. You can also purchase bins that are stiff, enclosed containers, or those that are flexible, plastic mesh (such as the Geobin).  Each set-up has its strengths and weaknesses. If you or your neighbors are concerned about pest issues developing, choose an enclosed set-up. If you want to compost large amounts of material and have an easier time turning it, choose the pallet option. They all serve the purpose of providing a place for your compost. Choose one that will get you started and you can always add on or change your mind later!

Wooden background with wood letters spelling out COMPOSTABLE.

2. Fuel

You have to have something to compost if you want to compost! The things that we can compost are traditionally divided into two categories – greens and browns. Browns are those items that have a higher ratio of carbon in their make-up and greens are those that have more abundant nitrogen in their make-up. You’ll see many recommended ratios that tell you how much you need of each in your compost pile. There is a lot of really complicated math that you can do to get your pile to just the right ratio. For a beginner, we are going to stick with the one to one rule. You should incorporate equal parts brown items and green items into your compost. For every one pound of greens, you should add one pound of browns.

Here is a chart with commonly composted items, whether they are considered a green or brown, and some items to avoid composting.  

What to put in your compost, poster by Robin Clungston.
POSTER IMAGE CREDITS: Robin Clungston
PURCHASE POSTER HERE

THINGS TO COMPOST:
GREENS
THINGS TO COMPOST:
BROWNS
1. Fruit and vegetable scraps
2. Grass clippings
3. Eggshells
4. Hair and/or pet hair
5. Coffee grounds and filters
6. Tea and tea bags
7. Yard waste (weed and disease free)
1. Uncoated cardboard (including paper rolls)
2. Newspaper (not glossy)
3. Sawdust or small wood chips
4. Napkins, paper towels, or paper bags
5. Dried leaves
6. Wood ash (natural wood only)

DO NOT COMPOST:
1. Pet Waste
2. Meat
3. Dairy
4. Whole eggs
5. Bones
6. Colored or waxed paper
7. Charcoal ash
8. Grease, oil, or fats
9. Diseased or weedy plants
10. Large pieces of wood
11. Plastics


Food and natural earth, ready to be composted.

3. Decomposers

Compost doesn’t just happen on it’s own! It sort of does but it doesn’t happen without the decomposers present that do the work of turning all that waste into “black gold”! Your compost pile will need all kinds of critters – some we can see and some we can’t – to break down waste efficiently. Your compost pile will be home to fungi, bacteria, animals like earthworms and insects, and more that will get to work making compost in your pile. The good news is that you really don’t have to do anything to get these good guys to show up. Nature will do that for you! However, you do have to make sure that they are able to thrive in your composting system. To do that you need…..

Up-close look at worms and other critters necessary to break down the compost.

4. Air

Those organisms living in your compost pile need air! Without good air circulation in your compost pile, it may begin to have an odor as anaerobic (without oxygen) decomposition starts happening. Fermentation is another common anaerobic process that definitely has an odor as well! Aerobic (with oxygen) decomposition is much faster and much healthier for your compost pile. You can make sure that your compost pile has good airflow simply by turning it once per week. Just take a pitchfork and give it some good stirs, like mixing up your favorite tossed salad. There are more sophisticated aeration systems you can try such as inserting a PVC pipe with holes drilled in the sides deep into the middle of your pile like a compost chimney. Again, we encourage you to start simple with a regular turning schedule. As you experiment and learn what works best for you, feel free to look into these more advanced strategies. 

A wooden compost bin.

5. Water

Those decomposers need water too! Fungi love moist, humid environments. Earthworms don’t survive in bone dry soils. Most metabolic processes happen faster when moisture is present. All of these things are true in your compost system too! The contents of your compost pile should be as moist as a wrung-out sponge. If you squeeze your compost and water comes out, it is too wet. If it feels totally dry to the touch, it is too dry. Except during periods of extreme weather, you should be able to bring a hose with you when you turn your pile weekly and add water to keep the pile at the right moisture level. Every few turns with the fork, turn the hose on and add some water. If you are experiencing extreme drought, add extra water. If you have seen heavy rainfalls, maybe skip that week. 

A metal compost bin with a shovel and composted dirt ready to use.

That’s it! Those five things will get you started with your dream composting system! Don’t forget that anything compostable will also break down on its own in nature without any help from you so the act of composting is really just about speeding along those natural processes and capturing the end product to use to amend the soils of our gardens and landscapes. You can’t do much to actually mess it up since nature will take care of the work eventually! So don’t be afraid to dive in, get started, learn a lot, and do so much good for the world through composting!


Ready to get started? You don’t need much but we have compiled a shopping list of some of our favorite composting systems and accessories to get you started!


PIN FOR LATER
Share Post

Those Plant Ladies

read & Leave a comment

Share Post

Leave a Reply

Your email address will not be published. Required fields are marked *

Explore the Blog

Dropping in with monthly inspo, strategies, and content created just for you. We're only sharing stuff we love... promise!

Let's Become

besties!

You're officially on the list and in like Flynn! See you on the inside!

Hot Damn!